

Deploy Keras neural network to Flask web service | Part 4 - Build a front end web application
text
Building a Front End Web Application
In this episode, we'll be building a front end web application with HTML and Javascript to interact with a Flask web service.

In the last episode, we built the backend of our application, the Flask web service. Now, we'll be building the front end that will interact with that service.
Recall, that this is the web application we're building.
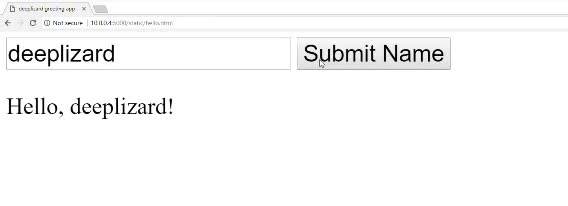
We enter our name into the text box, click Submit Name, and then the
Hello message is printed.
We know how Flask handles this data since we've already built the backend. We now are going to explore how the front end is created and how it sends and receives data to and from Flask.
Web application code
Within our flask_apps directory we set up last time, let's navigate into the static directory. Remember, this static directory is where we can place static files,
like HTML files, for Flask to serve as web pages. If we have our directory structure set up in this way, then by default, Flask will serve any HTML pages in this location to any user who browses to the page.
Go ahead and create a hello.html file in this directory.
If you're not already comfortable or familiar with how HTML works, remember that HTML just provides the structure of the web page. It does this by specifying tags that instruct what type of element each item on the page is. By
element, I mean things like input boxes, buttons, paragraphs, and so on. The tags I mentioned are denoted with angle brackets <>.
In the first line of this file, we have a DOCTYPE tag that specifies what type of document this is.
<!DOCTYPE html>
Structure of the page
Let's take a high level look at the structure first before we go line-by-line looking at the details.
<!DOCTYPE html>
<html>
<head>
    ...
    ...
    ...
</head>
<body>
    ...
    ...
    <script>
        ...
    </script>
    <script>
        ...
    </script>
</body>
</html>
We start with an html tag, which tells the browser that this is an HTML document, and if we look at the bottom of the document, we can see the closing html tag. All of our code
will be nested within these html tags.
Within the html tags, we have a head and a body. The head is where we store metadata about the page. The body is where we specify the structure
of the page and what types of elements are on the page.
Within the body, we have script tags, which is where we can use Javascript to deal with what the page actually does. The logic behind the page goes here. For example, when we typed
text into the input box of our application we saw at the start of the episode, the Javascript code is handling what happens with that text.
That's the high level structural overview. Let's go back to the top now and fill in the code for each section and discuss everything in detail.
The head of the page
<head>
<title>deeplizard greeting app</title>
<style>
    * {
        font-size:30px;
    }
</style>
</head>
Within our head tags, we have a title tag. This is where we specify the title of the web page, which we'll see is shown in the tab of our web browser. Let's call this
page deeplizard greeting app.
Next, we have a style tag, and here we can specify the style aspects of our web page. For this page, we're just setting the font-size to 30px (
px means pixels), and the * means that we want ALL the font on our page to be this size.
Then we have closing tags for both the style and the head. Next, we have our body.
The body of the page
<body>
<input id="name-input" type="text"/>
<button id="name-button">Submit Name</button>
<p id="greeting"></p>

<script src="https://code.jquery.com/jquery-3.3.1.min.js"></script>
<script>
    $("#name-button").click(function(event){
        let message = {
            name: $("#name-input").val()
        }
        $.post("http://10.0.0.4:5000/hello", JSON.stringify(message), function(response){
            $("#greeting").text(response.greeting);
            console.log(response);
        });
    });
</script>
</body>
</html>
Within the body, we first have an input tag. This is the text box where we enter our name. We give it an id of “name input”. IDs are what we use to refer
to elements on the web page. Next we give it a type attribute of "text", which is what specifies that this input element will be a text box.
We then have a button tag, which we give an id of “name button”, and we assign the text Submit Name to this button. So, this "Submit
Name" is the text that is actually overlaying the button for the user to see and get an idea of what the button does.
Lastly, we have a p tag, which is a paragraph tag that we give the id of “greeting” to, but we don't specify any text to be displayed within this
paragraph. This paragraph is for the area on the screen where the "Hello" message will be displayed after we submit our name.
Next, we have a script tag that is pointing to a CDN, a
content delivery network, which is a web server that we're importing jQuery from. jQuery is a Javascript library that we'll be making use of that works to simplify Javascript code.
We then have another script tag that actually contains all of our Javascript logic for what to do when the web page receives input in the text box and the button is clicked.
The first line in this script admittedly looks kind of funky if you've not worked with jQuery before. Generally, if we want to grab some HTML element from the page and do something with it, we need a way to refer to that element. With jQuery,
we can refer to an element by typing $(), and within the parentheses, pass the id of the element you want to work with prefixed with
the # symbol.
So in our case, we're referring to the element with the id “name button”. Looking back up to the top of the body, we can see that's the
id we assigned to our button that the user clicks after entering their name in the box.
So on this element, we're calling the jQuery function click. This click function is an event handler that tells the page what to do when the name button is clicked. To
click, we pass a callback function that contains the logic for what to do once a user clicks our button.
If a click event happens, we define a variable called message, and we set it to a Javascript object. This allows us to organize data into key-value pairs.
To create a Javascript object, we place all our key-value pairs into curly braces {}. Here, our object only contains one key-value pair. The key is name, and let's see what
we're setting our value to.
Well, we're referring to the element with the id name-input so looking back to the top of the body, this id is the id we assigned to our
input box. So we're getting this element and calling the jQuery function val on it. val returns the value from an element. In this case, the value will be what
the user typed into the text box, so presumably, it will be the user's name.
We then call the jQuery function post, by using the $. notation. $ represents a jQuery object. post is a function that sends data to a web service using
an HTTP POST request. Remember from
last time, a POST request will be
sending data.
To the post function, we pass a string that contains the URL to our hello endpoint, which we've already created. So this string is specifying where we need to send the data.
Be sure to substitute in the address for your Flask server, or if your HTML and Flask server reside on the same machine, you can substitute localhost.
Next, we specify what to send. This is going to be our message variable we created earlier that contains the name from our text box.
Before we send our message, we need to stringify it using this JSON.stringify function, which will basically just format our message variable, which was a Javascript object, into JSON. Remember,
we know that our endpoint is expecting the data it receives to be in JSON, so that's why we're formatting it as such here.
We now have where to send and what to send. The last argument we pass is a function that specifies what our web app needs to do once it receives a response from the web server. So, the web app sends our name from the input box to our web service, and then if the web service sends something back to us, what should the web app do with the response? That's what this function is in charge of.
In this case, we're grabbing the element that has the id greeting, so looking back up top, remember that is the id that we assigned to the paragraph p tag, which
is currently empty.
So we get that element and then we call the text function on it. This function will set the text in the paragraph. We're setting that text to the web service's response that it
sent back to us. We're actually calling response.greeting.
If you recall, the response we defined for the hello endpoint was in JSON, and it had a single key value pair. The key was called greeting, and the value for greeting was the string
"hello" + name. So we're setting the text of the paragraph on our web page to be equal to the string “hello, deeplizard” or whatever name you choose
to submit.
Lastly, we're also logging the response we get back from the web service to the Javascript console.
We then close our function that handles the response, and then close the function that handles the click event. Finally, we close the script, body, and html tags.
Testing the web app
We can see that all this web app is doing is supplying a user with a text box and a button. Once text is supplied to the box, and the button is clicked, the web app stores the value from the text box in JSON. It then sends this JSON in the form of an
HTTP POST request to the hello endpoint of the Flask web service. It then obtains the JSON response from the endpoint, and displays it on the
web page and logs it to the console.
If your Flask app that we developed last time isn't already running, go ahead and start it now using the instructions from the last episode.
Then, we need to browse to the hello.html page we just built by browsing to the IP address of the Flask server and following that address with the Flask port 5000. You should substitute
your IP address for the address below, or if you're browsing from the same machine where the Flask server resides, you can substitute localhost. http://10.0.0.4:5000/static/hello.html
There we have it! Go ahead and test out your app by supplying your name and hitting the submit button. You can also launch the Javascript console on your browser by hitting the f12 button, then
navigating to the Console tab, and when you submit your name, you'll also see the response from the Flask service logged in the browser console as well since we included a line in our
code to do that.
We've now come full circle by creating a front end web application and a backend web service and passed data back and forth between the two in the from of HTTP requests and responses.
Make sure you're comfortable with this because next, we'll be seeing how this all works with our Keras model. Let me know your status in the comments! See ya in the next one.
quiz
 DEEPLIZARD
Message
DEEPLIZARD
Message
resources
updates
Committed by on