MobileNet Image Classification with TensorFlow's Keras API
text
MobileNet image classification with TensorFlow's Keras API
In this episode, we'll introduce MobileNets, a class of light weight deep convolutional neural networks that are vastly smaller in size and faster in performance than many other popular models. We'll also see how we can work with MobileNets in code using TensorFlow's Keras API.

MobileNets are a class of small, low-latency, low-power models that can be used for classification, detection, and other common tasks convolutional neural networks are good for. Because of their small size, these are considered great deep learning models to be used on mobile devices.
Comparing MobileNets to other models
To give a quick comparison in regards to size, the size of the full VGG16 network on disk is about 553 megabytes. The size of one of the currently largest MobileNets is about 17 megabytes, so that is a huge difference, especially when you think about deploying a model to a mobile app or running it in the browser.
| Model | Size | Parameters |
|---|---|---|
| VGG16 | 553 MB |
138,000,000 |
| Mobile Net | 17 MB |
4,200,000 |
This vast size difference is due to the number of parameters within these networks. For example, VGG16 has 138 million parameters, while the 17 megabyte MobileNet we just mentioned has only 4.2 million.
Aside from the size of the networks on disk, the size of the networks in memory also grows as the number of network parameters grow. In later episodes, we're going to test and demonstrate the performance differences between these models, so stay tuned for that.
Now, while MobileNets are faster and smaller than other major networks, like VGG16, for example, there is a tradeoff. That tradeoff is accuracy, but don't let this discourage you.
Yes, MobileNets typically aren't as accurate as these other large, resource-heavy models, but they still actually perform very well, with really only a relatively small reduction in accuracy. Here is a MobileNets paper that elaborates further on this tradeoff if you're interested in studying this further.
Now let's see how we can start working with MobileNets in Keras.
MobileNet with Keras
First, we'll to import all the resources we'll be using over the next few MobileNet episodes.
import numpy as np
import tensorflow as tf
from tensorflow import keras
from tensorflow.keras.layers import Dense, Activation
from tensorflow.keras.optimizers import Adam
from tensorflow.keras.metrics import categorical_crossentropy
from tensorflow.keras.preprocessing.image import ImageDataGenerator
from tensorflow.keras.preprocessing import image
from tensorflow.keras.models import Model
from tensorflow.keras.applications import imagenet_utils
from sklearn.metrics import confusion_matrix
import itertools
import os
import shutil
import random
import matplotlib.pyplot as plt
%matplotlib inline
A GPU is not required to follow the upcoming code, but if you are using one, you'll need to first follow the GPU setup we covered in a previous episode. We can then check to be sure that TensorFlow is able to identify the GPU using the code below. It's also useful to enable memory growth on the GPU.
physical_devices = tf.config.experimental.list_physical_devices('GPU')
print("Num GPUs Available: ", len(physical_devices))
tf.config.experimental.set_memory_growth(physical_devices[0], True)

> Num GPUs Available:  1
What we're going to do is download a MobileNet model, and then use it for inference just on a few random images to see how well it classifies these images according to ImageNet classes.
We first make a call to tf.keras.applications.mobilenet.MobileNet() to obtain a copy of a single pretrained MobileNet with weights that were saved from being trained on ImageNet images. We're
assigning this model to the variable mobile.
mobile = tf.keras.applications.mobilenet.MobileNet()
Next, we have a function called prepare_image() that accepts an image file, and processes the image to get it in a format that the model expects. We'll be passing each of
our images to this function before we use MobileNet to predict on it, so let's see what exactly this function is doing.
def prepare_image(file):
    img_path = 'data/MobileNet-samples/'
    img = image.load_img(img_path + file, target_size=(224, 224))
    img_array = image.img_to_array(img)
    img_array_expanded_dims = np.expand_dims(img_array, axis=0)
    return tf.keras.applications.mobilenet.preprocess_input(img_array_expanded_dims)
Within this function, we first define the relative path to the images. I have all the sample images we'll be using stored in data/MobileNet-samples.
We then call the Keras function image.load_img() which accepts the image file and a target_size for the image, which we're setting to (224,224) (which is the
default size for MobileNet). load_img() returns an instance of a PIL image.
We then convert the PIL image into an array with the Keras img_to_array() function, and then we expand the dimensions of that array by using numpy's expand_dims().
Lastly, we're calling preprocess_input() from tf.keras.applications.mobilenet, which preprocesses the given image data to be in the same format as the images that MobileNet
was originally trained on. Specifically, it's scaling the pixel values in the image between -1 and 1, and this function will return the preprocessed image data as a numpy
array.
This result is what we're returning within this overall prepare_image() function.
Predicting with MobileNet
Let's now get some predictions from MobileNet and see how it performs. We'll be using some random sample images.
MobileNet lizard prediction
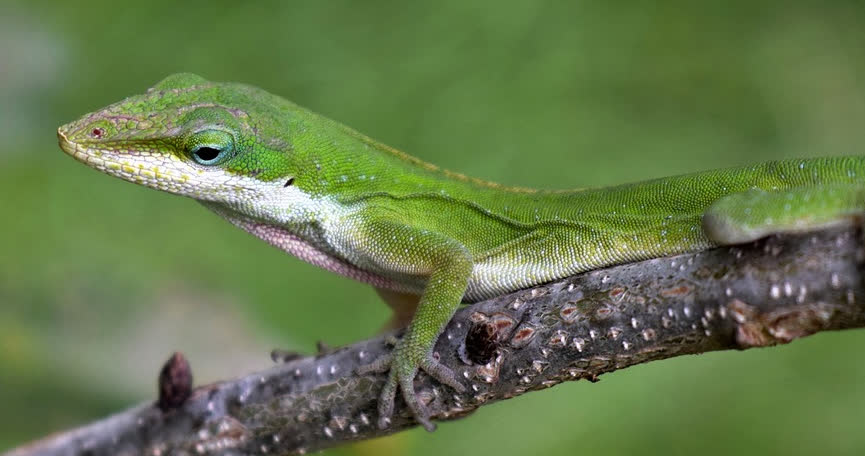
Here is our first image, a lizard.
from IPython.display import Image
Image(filename='data/MobileNet-samples/1.PNG', width=300,height=200)

We're going to process this image by passing it to our prepare_image() function and assign the result to this preprocessed_image variable. We're then having MobileNet
predict on this image by calling mobile.predict() and passing it our preprocessed_image.
preprocessed_image = prepare_image('1.PNG')
predictions = mobile.predict(preprocessed_image)
Then, we're using an ImageNet utility function provided by Keras called decode_predictions(). It returns the top five ImageNet class predictions with the ImageNet class ID, the class
label, and the probability. With this, we'll be able to see the five ImageNet classes with the highest prediction probabilities from our model on this given image. Recall that there are 1000 total
ImageNet classes.
results = imagenet_utils.decode_predictions(predictions)
Checking out the results, we have American_chameleon with 58%, then green_lizard at 28%, agama at 13%, and a couple
other types of lizards at less than 1%.
[[('n01682714', 'American_chameleon', 0.5843147),
  ('n01693334', 'green_lizard', 0.2785562),
  ('n01687978', 'agama', 0.13019584),
  ('n01689811', 'alligator_lizard', 0.0047072913),
  ('n01688243', 'frilled_lizard', 0.0016176497)]]
The lizard in the image is actually an American chameleon, so the model did well at assigning that class the highest probability. The remaining four classes are all different types of similar lizards as well, so overall I'd say the model did a good job at classifying this one.
MobileNet espresso prediction
Let's do another prediction, this time on this delicious looking cup of espresso.
Image(filename='data/MobileNet-samples/2.PNG', width=300,height=200)

We're using the exact same code as we used for the lizard, except we're just now pointing to the image of the espresso.
preprocessed_image = prepare_image('2.PNG')
predictions = mobile.predict(preprocessed_image)
results = imagenet_utils.decode_predictions(predictions)
The results for this one are spectacular.
[[('n07920052', 'espresso', 0.9867621),
  ('n07930864', 'cup', 0.0068946183),
  ('n07932039', 'eggnog', 0.0028749541),
  ('n03063599', 'coffee_mug', 0.0021079157),
  ('n04597913', 'wooden_spoon', 0.0010108481)]]
The model assigned a 98.7% probability to the image being espresso, and the remaining four classes with the next highest probabilities are all reasonable as well, with
cup,
eggnog, coffee_mug, and wooden_sppon.
MobileNet strawberry prediction
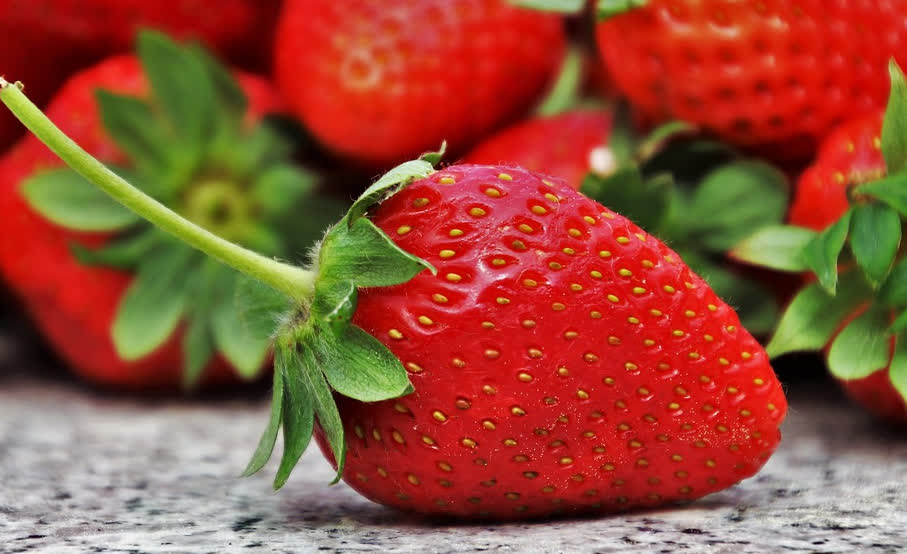
Let's check out another one. This time we'll be passing an image of a strawberry.
Image(filename='data/MobileNet-samples/3.PNG', width=300,height=200)

Same code, new image.
preprocessed_image = prepare_image('3.PNG')
predictions = mobile.predict(preprocessed_image)
results = imagenet_utils.decode_predictions(predictions)
Viewing the results, we have another extremely good prediction with a 99.99% probability being assigned to strawberry.
[[('n07745940', 'strawberry', 0.9999896),
  ('n07749582', 'lemon', 2.4314522e-06),
  ('n07747607', 'orange', 1.7603447e-06),
  ('n07768694', 'pomegranate', 1.5602129e-06),
  ('n07753275', 'pineapple', 8.5766914e-07)]]
We can see that MobileNet is doing a great job at classifying images right out of the box. We'll be continuing to work with MobileNet in the next episode where we'll see how we can fine-tune the model and use transfer learning on a new data set.
quiz
resources
updates
Committed by on


 DEEPLIZARD
Message