TensorFlow.js - Serve deep learning models with Node.js and Express
text
What's up, guys?
In this post, we'll go through the process of getting a web server set up to host deep learning web applications and serve deep learning models with Express for Node.js, so let's get to it.

To build deep learning applications that run in the browser, we need a way to host these applications and a way to host the models. Really, we just a way to serve static files.
If you followed the series on deploying Keras models, then you know that we already have a relatively easy way of hosting static files, and that's with Flask.
Flask, though, is written in Python, and while it would work perfectly fine to host the TensorFlow.js applications we'll be developing, it makes sense that we might want to use a JavaScript-based technology to host our apps since we're kind of breaking away from Python and embracing JavaScript in this series.
Enter Express for Node.js.
Express is a minimalist web framework, very similar to Flask, but is for Node.js, not Python. And if you're not already familiar with Node.js, you're probably wondering what it is as well.

Node.js, which we'll refer to most of the time as just “Node,” is an open-source run-time environment that executes JavaScript code on the server-side.
See, historically, JavaScript has been used mainly for client-side applications, like browser applications, for example, but Node allows us to write server-side code using JavaScript. We'll specifically be making use of Express to host our web applications and serve our models.
So, let's see how we can do that now!
Setting up the environment
First things first, we need to install Node.js. I'm here on the Downloads page of Node's website, so you just need to navigate to this page, choose the installation for your operating system, and get it installed.
I've installed Node on a Windows machine, but you'll still be able to follow the demos we'll see in a few moments even if you're running another operating system.
Alright, after we've got Node installed, we need to create a directory that will hold all of our project files. We have this directory here that I've called
TensorFlowJS.
./TensorFlowJS
  local-server/
    package.json
    server.js
  static/
Within this directory, we'll create a sub-directory called
local-server, which is where the Express code that will run our web server will reside, and we'll also create a
static directory, which is where our web pages and eventually our models will reside.
Within this
local-server, we create a
package.json file, which is going to allow us to specify the packages that our project depends on. Let's go ahead and open this file.
I've opened this with Visual Studio Code, which is a free, open source code editor developed by Microsoft that can run on Windows, Linux, and Mac OS. This is what we'll be using to write our code, so you can download it and use it yourself as well, or you can use any other editor you'd like.
Package.json file
Alright, back to the
package.json file.
{
    "name": "tensorflowjs",
    "version": "1.0.0",
    "dependencies": {
    "express": "latest"
    }
}
Within
package.json, we're going to specify a
name for our project, which we're calling
tensorflowjs (all lower case per the requirements).
We'll also specify the
version of our project. There's some specs that the format of this version has to meet, but most simplistically, it has to be in an x.x.x format, so we're just going to go with
the default
1.0.0.
Alright,
name and
version are the only two requirements for this file, but there are several other optional items we can add, like a description, the author, and a few others.
We're not going to worry about this stuff, but we are going to add one more thing: the
dependencies. This specifies the dependencies that our project needs to run. We're specifying
express here since that's what we'll be using to host our web apps, and we're also specifying the version.
Installing dependencies
Now, we're going to open Powershell. We have the ability to open it from right within this editor by navigating to View > Integrated terminal.
You should have the ability to open the terminal of your choice that's appropriate for your operating system if you're running on Linux, for example, and don't have Powershell. Otherwise, though, you can just open the terminal outside of the editor if you'd like.
NPM (Node Package Manager)
Alright, so from within Powershell, we make sure we're inside of the local-server directory where the
package.json file is, and we're going to run
npm install.
Npm stands for
Node Package Manager, and by running
npm install, npm will download and install the dependencies listed in our
package.json file.
PS C:\deeplizard-code\projects\TensorFlowJS\local-server>
npm install
Let's run
npm install, and we'll see that it installs Express.
And when this is finished, you can see that we now have an added
node_modules directory that contains the downloaded packages, and we additionally have this
package-lock.json file that contains information about the downloaded dependencies. Don't delete this things.
Building a server with Express
At this point, we have Node. We have Express.
Now, we need to write a Node program that will start the Express server and will host the files we specify. To do this, we'll create this file called
server.js.
let express = require("express");
let app = express();

app.use(function(req, res, next) {
    console.log(`${new Date()} - ${req.method} request for ${req.url}`);
    next();
});

app.use(express.static("../static"));

app.listen(81, function() {
    console.log("Serving static on 81");
});
Inside of
server.js, we first import Express using
require("express"). Using
require() like this will import the Express module and give our program access to it. You can think of a module in Node as being analogous to a library in JavaScript or Python. Just a group
of functions that we want to have access to from within our program.
And then we create an Express application using the
express module, which we assign to
app.
Middleware
An Express app is essentially a series of calls to functions that we call middleware functions. Middleware functions have access to the HTTP
request and
response objects as well as the
next() function in the application's request-response cycle, which just passes control to the next handler.
So within this app, when a request comes in, we're doing two things. We're first logging information about the request to the terminal where the Express server is running, and we then pass control to the next handler, which will respond by serving any static files that we've placed in this directory called static that's right within the root directory of our TensorFlowJS project.
So in our case, the middleware functions I mentioned are here:
function(req, res, next) {
    console.log(`${new Date()} - ${req.method} request for ${req.url}`);
    next();
}
and here:
express.static("../static")
Note that the calls to
app.use() are only called once, and that's when the server is started. The
app.use() calls specify the middleware functions, and calls to those middleware functions will be executed each time a request comes in to the server.
Lastly, we call
app.listen() to specify what port Express should listen on. I've specified port 81 here, but you can specify whichever unused port you'd like. When the server starts up and starts
listening on this port, this function will be called, which will log this message letting us know that the server is up and running.
Wrapping up
Alright, we're all set up!
Let's drop a sample HTML file into our
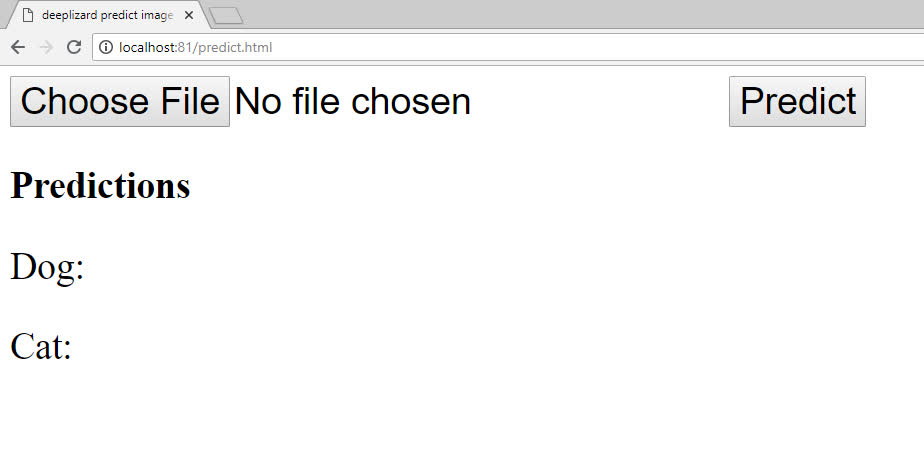
static directory, then start up the Express server and see if we can browse to the page. We're going to actually just place the web application called
predict.html that we created in the Keras deployment series into this directory as a proof of concept. So we place that here. You can use any HTML file you'd like though to test this.
Now, to start Express, we use Powershell. Let's make sure we're inside the
local-server directory, and we run
node server.js.
PS C:\deeplizard-code\projects\TensorFlowJS\local-server>
node server.js

> Serving static on 81
We get our output message letting us know that Express is serving the files from our
static directory on port 81. So now let's browse to http://localhost:81/predict.html, which is the name of the file we placed in the
static directory.

And here we go!
This is indeed the web page we wanted to be served. We can also check out the output from this request in Powershell to view the logging that we specified.
So, good! We now have Node and Express set up to be able to serve our models and host our TensorFlow.js apps that we'll be developing coming up. Give me a signal in the comments if you were able to get everything up and running, and I'll see ya in the next video.
quiz
resources
updates
Committed by on


 DEEPLIZARD
Message