

TensorFlow.js - Loading the model into a neural network web app
text
Developing a Client-side Deep Learning Application
What's up, guys? In this post, we'll continue the development of the client-side deep learning application we started last time, so let's get to it.

In the last post, we built the UI for our image classification web app. Now, we'll focus on the JavaScript that handles all the logic for this app. We'll also start getting acquainted with the TensorFlow.js API.
Let's get right into the code!
./TensorFlowJS
    local-server/
    static/
        tfjs-models/
        imagenet_classes.js
        predict-with-tfjs.html
        predict.js
Recall, in the
last post we created this predict.js file within the static directory but left it empty. This file now contains the JavaScript logic that handles what will happen when a user
submits an image to the application. Let's look at the specifics for what's going on with this code.
Selecting an image
$("#image-selector").change(function () {
    let reader = new FileReader();
    reader.onload = function () {
        let dataURL = reader.result;
        $("#selected-image").attr("src", dataURL);
        $("#prediction-list").empty();
    }
    let file = $("#image-selector").prop("files")[0];
    reader.readAsDataURL(file);
});
We first specify what should happen when an image file is selected with the image-selector. When a new image is selected, the change() event will be triggered on the
image-selector.
When this happens, we first create this FileReader object called reader to allow the web app to read the contents of the selected file.
We then set the onload handler for reader, which will be triggered when reader successfully reads the contents of a file. When this happens, we first initialize this
dataURL variable as reader.result, which contains the image data as a URL that represents the file's data as a base64 encoded string.
We then set the source attribute of the selected image to the value of dataURL.
Lastly, within the onload handler, we need to get rid of any previous predictions that were being displayed for previous images. We do this by calling empty() on the
prediction-list element.
Next, we get the selected file from the image-selector, and load the image by calling readAsDataURL on reader and passing in the selected image file.
Loading the model
Next, we instantiate this model variable, and we're going to define it directly below. This below section may look a little strange if you're not already a JavaScript wiz. So, let's
check it out.
let model;
(async function () {
    model = await tf.loadLayersModel("http://localhost:81/tfjs-models/VGG16/model.json");
    $(".progress-bar").hide();
})();
Here we have what's called an IIFE or Immediately Invoked Function Expression.
We can see this is structured by placing the function within parentheses and then specifying the call to the function with these parentheses that immediately follow.
An IIFE is a function that runs as soon as it's defined.
Within this function, we load the model by calling the TensorFlow.js function tf.loadLayersModel(), which accepts a string containing the URL to the model.json file.
Recall from the
last post, we showed how the model.json file and corresponding weight files should be organized within our static directory that's being served by Express.
We're first going to be working with VGG16 as our model, so I've specified the URL to where the model.json file for VGG16 resides.
tf.loadLayersModel() returns a Promise. Meaning that this function promises to return the model at some point in the future.
This await key word pauses the execution of this wrapping function until the promise is resolved and the model is loaded. This is why we use the async keyword when defining this
function... Because if we want to use the await keyword, then it has to be contained within an async function.
Modifying the HTML
Now, in the time since the last video, I've added a progress bar to the UI to indicate to the user when the model is loading. As soon as the promise is resolved, we're then hiding the progress bar from the UI, which indicates the model is loaded.
Before moving on, let's quickly jump over to the HTML we developed last time so I can show you where I inserted this progress bar.
class="row">
    class="col-12">
        class="progress progress-bar progress-bar-striped progress-bar-animated mb-2">Loading Model
Here, we are in predict-with-tfjs.html, and you can see that right within the first div, the container, I've inserted this row where the
progress bar is embedded. We'll see it in action within the UI at the end of this video.
Alright, jumping back over to the JavaScript, we now need to write the logic for what happens when the predict button is clicked.
Pre-processing the image

When a user clicks the predict button, we first get the image from the selected-image element. Then, we need to transform the image into a rank-4 Tensor object of floats with height and width
dimensions of 224 x 224 since that the model expects.
let image = $("#selected-image").get(0);
let tensor = tf.browser.fromPixels(image)
    .resizeNearestNeighbor([224, 224])
    .toFloat()
    .expandDims();

// More pre-processing to be added here later

let predictions = await model.predict(tensor).data();
To do this, we create a Tensor object from the image by calling the TensorFlow.js function tf.browser.fromPixels() and passing our image to it.
We then resize the image to 224 x 224, cast the tensor's type to float32, and expand the tensor's dimensions to be of rank-4.
We're doing all of this because the model expects the image data to be organized in this way. Note that all of these transformations are occurring with calls to functions from the TensorFlow.js API.
Alright, we have the Tensor object of image data that the model expects.
Now, VGG16 actually wants the image data to be further preprocessed in a specific way beyond the basics we just completed. There are transformations to the underlying pixel data that need to happen for this preprocessing that VGG16 wants.
In other libraries, like Keras, preprocessing functions for specific models are included in the API. Currently, though, TensorFlow.js does not have these preprocessing functions included, so we need to build them ourselves. We're going to build a preprocessing function in the next post to handle this.
So for right now, what we'll do is pass in the image data contained in our Tensor object as-is to the model. The model will still accept the data as input, it just won't do a great
job with it's predictions since the data hasn't been processed in the same way as the images that VGG16 was trained on.
So, we'll go ahead and get this app functional now, and then we'll circle back around to handle the preprocessing in the next post and insert it appropriately then.
Getting a prediction
Alright, so a user clicks the predict button, we transform the image into a tensor, and now we can pass the image to the model to get a prediction. We do that by calling predict() on the model
and passing our tensor to it. predict() returns a tensor of the output predictions for the given input.
let predictions = await model.predict(tensor).data();
let top5 = Array.from(predictions)
    .map(function (p, i) {
        return {
            probability: p,
            className: IMAGENET_CLASSES[i]
        };
    }).sort(function (a, b) {
        return b.probability - a.probability;
    }).slice(0, 5);
We then call data() on the predictions tensor, which asynchronously loads the values from the tensor and returns a Promise of a TypedArray after the computation
completes. Notice the await and async keywords here that we discussed earlier.
So, this predictions array is going to be made up of 1000 elements, each of which corresponds to the prediction probability for an individual ImageNet class. Each index in the array maps to
a specific ImageNet class.
Now, we want to get the top five highest predictions out of all of these since that's what we'll be displaying in the UI. We'll store these top five in this top5 variable.
Before we sort and slice the array to get the top five, we need to map the prediction values to their corresponding ImageNet classes.
For each prediction in the array, we return a JavaScript object that contains the probability and the ImageNet class name. Notice how we use the index of each prediction to obtain the class name from the IMAGENET_CLASSES array that we imported from the imagenet_classes.js JavaScript file.
We then sort the list of JavaScript objects by prediction probability in descending order and obtain the first five from the sorted list using the slice() function.
We then iterate over the top five predictions, and store the class names and corresponding prediction probabilities in the prediction list of our UI.
$("#prediction-list").empty();
top5.forEach(function (p) {
$("#prediction-list").append(`And that's it! Let's now start up our Express server and browse to our app.
Testing the app
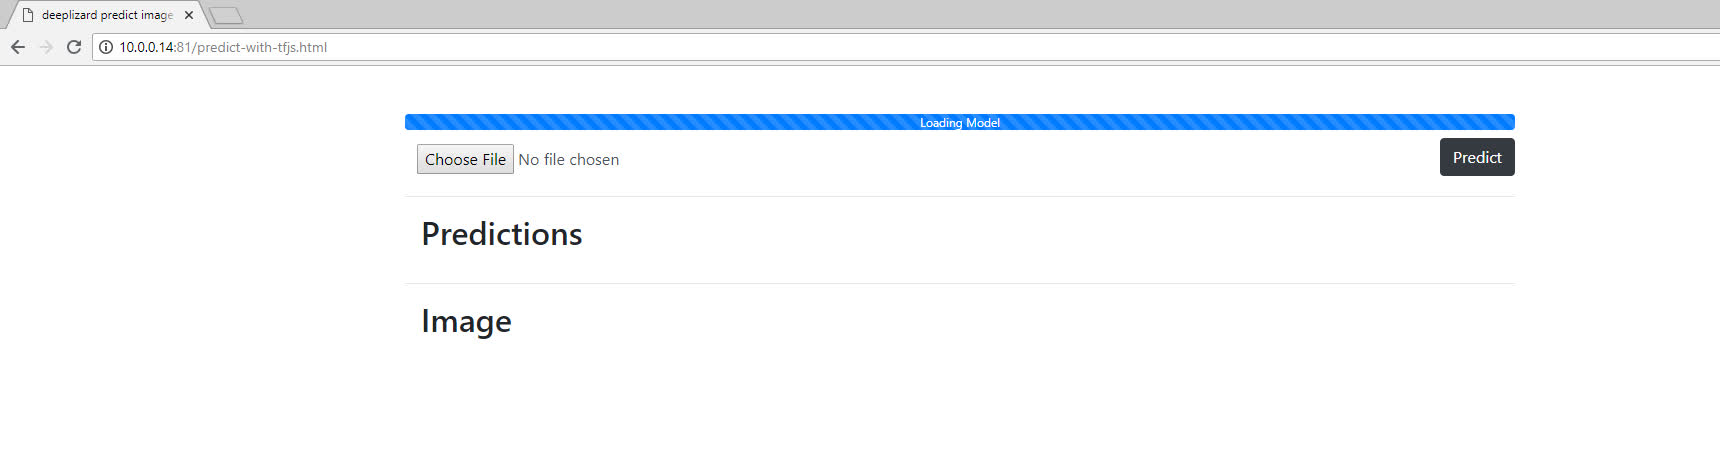
Alright, we're here, and we've got indication that our model is loading.
I paused the video while this model was continuing to load, and it ended up taking about 40 seconds to complete. Not great! It may take even longer for you depending on your specific computing resources.
Remember though, I said we'd run into some less than ideal situations with running such a large model like VGG16 in the browser. The time it takes to load the model is first issue. We've got over 500 MB of files to load into the browser for this model, hence the long loading time.
Alright, well our model is loaded, so now let's choose an image and predict on it.
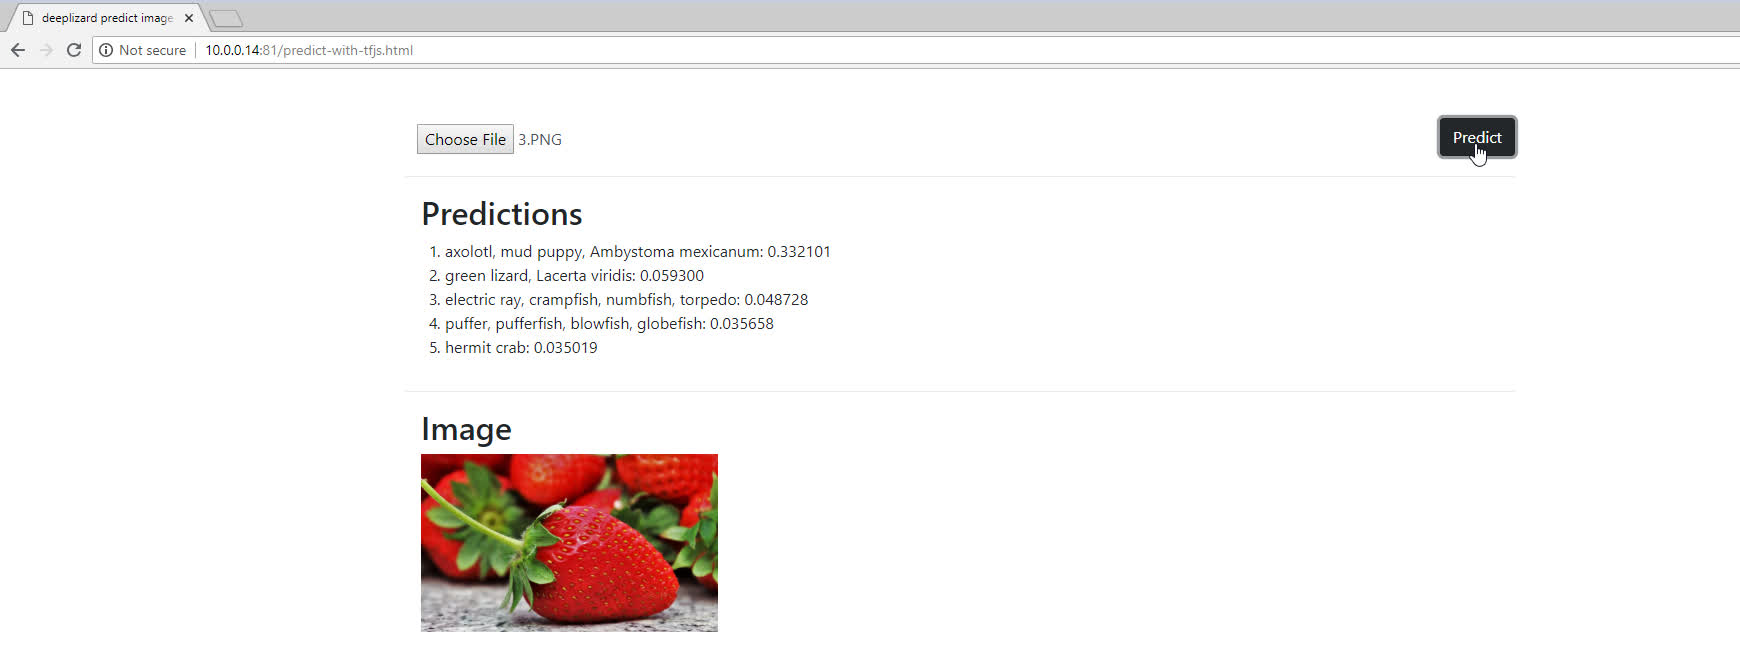
Hm… about a five second wait time to get a prediction on a single image. Again, not great.
Oh, and yeah, the displayed prediction is not accurate, but that doesn't have anything to do with the model size or anything like that. It's just because we didn't include the preprocessing for VGG16, remember?
We're going to handle that in the next post. There, we'll get further exposure to the TensorFlow.js API by exploring the tensor operations we'll need to work with to do the preprocessing.
Alright, so we've got that coming up, and then afterwards, we'll solve all these latency issues attributed to using a large model by substituting MobileNet in for VGG16.
Let me know in the comments if you were able to get your app up and running, and I'll see ya in the next one!
quiz
 DEEPLIZARD
Message
DEEPLIZARD
Message
resources
updates
Committed by on