

CNN Flatten Operation Visualized - Tensor Batch Processing for Deep Learning
text
Flatten operation for a batch of image inputs to a CNN
Welcome back to this series on neural network programming. In this post, we will visualize a tensor flatten operation for a single grayscale image, and we'll show how we can flatten specific tensor axes, which is often required with CNNs because we work with batches of inputs opposed to single inputs.
Without further ado, let's get started.
Flattening an entire tensor
A tensor flatten operation is a common operation inside convolutional neural networks. This is because convolutional layer outputs that are passed to fully connected layers must be flatted out before the fully connected layer will accept the input.
In past posts, we learned about a tensor's shape and then about reshaping operations. A flatten operation is a specific type of reshaping operation where by all of the axes are smooshed or squashed together.
To flatten a tensor, we need to have at least two axes. This makes it so that we are starting with something that is not already flat. Let's look now at a hand written image of an eight from the MNIST dataset. This image has 2 distinct dimensions,
height and
width.
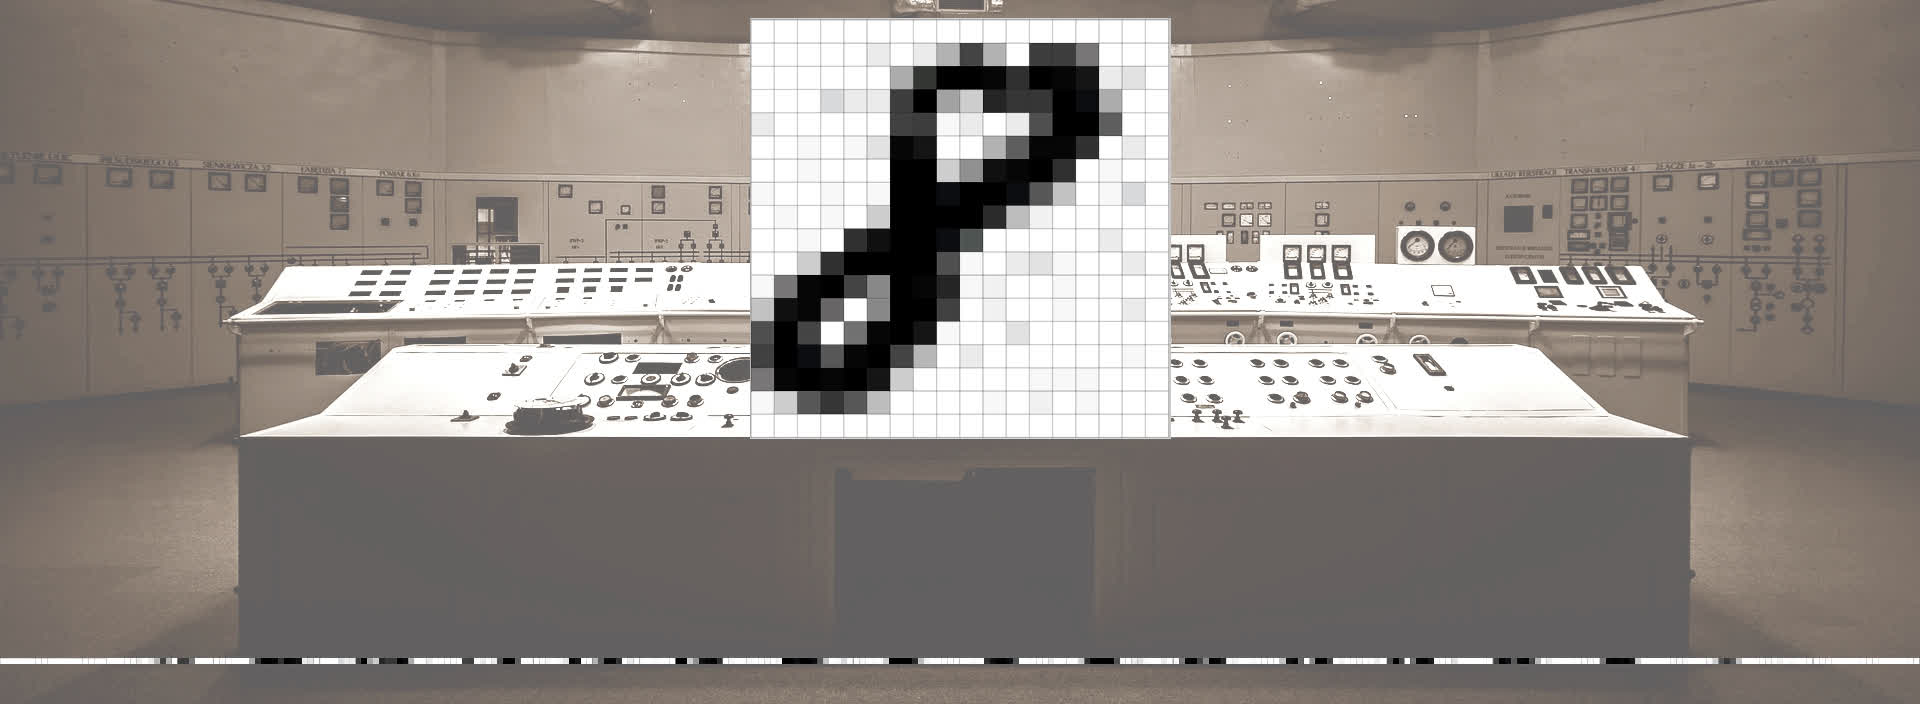
The height and width are 18 x 18 respectively. These dimensions tell us that this is a cropped image because the MNIST dataset contains 28 x 28 images. Let's see now how
these two axes of height and width are flattened out into a single axis of length 324.
The image above shows our flattened output with a single axis of length 324. The white on the edges corresponds to the white at the top and bottom of the image.
In this example, we are flattening the entire tensor image, but what if we want to only flatten specific axes within the tensor? This is typically required when working with CNNs.
Let's see how we can flatten out specific axes of a tensor in code with PyTorch.
Flattening specific axes of a tensor
In the post on
CNN input tensor shape, we learned how tensor inputs to a convolutional neural network typically have 4 axes, one for batch size, one for color channels, and one each for height and width.
(Batch Size, Channels, Height, Width)
Let's kick things off here by constructing a tensor to play around with that meets these specs. To start, suppose we have the following three tensors.
Building a tensor representation for a batch of images
t1 = torch.tensor([
    [1,1,1,1],
    [1,1,1,1],
    [1,1,1,1],
    [1,1,1,1]
])

t2 = torch.tensor([
    [2,2,2,2],
    [2,2,2,2],
    [2,2,2,2],
    [2,2,2,2]
])

t3 = torch.tensor([
    [3,3,3,3],
    [3,3,3,3],
    [3,3,3,3],
    [3,3,3,3]
])
Each of these has a shape of 4 x 4, so we have three rank-2 tensors. For our purposes here, we'll consider these to be three 4 x 4 images that well use to create a batch
that can be passed to a CNN.
Remember, batches are represented using a single tensor, so we'll need to combine these three tensors into a single larger tensor that has three axes instead of 2.
> t = torch.stack((t1, t2, t3))
> t.shape

torch.Size([3, 4, 4])
Here, we used the stack() method to concatenate our sequence of three tensors along a new axis. Since we have three tensors along a new axis, we know the length of this axis should be
3, and indeed, we can see in the shape that we have 3 tensors that have height and width of 4.
Want to know how the stack() method works? An explanation of the stack() method comes
later in the series.
The axis with a length of 3 represents the batch size while the axes of length 4 represent the height and width respectively. This is what the output for this this tensor representation
of batch looks like.
> t
tensor([[[1, 1, 1, 1],
         [1, 1, 1, 1],
         [1, 1, 1, 1],
         [1, 1, 1, 1]],

        [[2, 2, 2, 2],
         [2, 2, 2, 2],
         [2, 2, 2, 2],
         [2, 2, 2, 2]],

        [[3, 3, 3, 3],
         [3, 3, 3, 3],
         [3, 3, 3, 3],
         [3, 3, 3, 3]]])
At this point, we have a rank-3 tensor that contains a batch of three 4 x 4 images. All we need to do now to get this tensor into a form that a CNN expects is add an axis for the color channels.
We basically have an implicit single color channel for each of these image tensors, so in practice, these would be
grayscale images.
A CNN will expect to see an explicit color channel axis, so let's add one by reshaping this tensor.
> t = t.reshape(3,1,4,4)
> t
tensor(
[
    [
        [
            [1, 1, 1, 1],
            [1, 1, 1, 1],
            [1, 1, 1, 1],
            [1, 1, 1, 1]
        ]
    ],
    [
        [
            [2, 2, 2, 2],
            [2, 2, 2, 2],
            [2, 2, 2, 2],
            [2, 2, 2, 2]
        ]
    ],
    [
        [
            [3, 3, 3, 3],
            [3, 3, 3, 3],
            [3, 3, 3, 3],
            [3, 3, 3, 3]
        ]
    ]
])
Notice how we have specified an axis of length 1 right after the batch size axis. Then, we follow with the height and width axes length 4. Also, notice how the additional axis of
length 1 doesn't change the number of elements in the tensor. This is because the product of the components values doesn't change when we multiply by one.
The first axis has 3 elements. Each element of the first axis represents an image. For each image, we have a single color channel on the channel axis. Each of these channels contain
4 arrays that contain 4 numbers or scalar components.
Let's see this with code by indexing into this tensor.
We have the first image.
> t[0]
tensor([[[1, 1, 1, 1],
         [1, 1, 1, 1],
         [1, 1, 1, 1],
         [1, 1, 1, 1]]])
We have the first color channel in the first image.
> t[0][0]
tensor([[1, 1, 1, 1],
        [1, 1, 1, 1],
        [1, 1, 1, 1],
        [1, 1, 1, 1]])
We have the first first row of pixels in the first color channel of the first image.
> t[0][0][0]
tensor([1, 1, 1, 1])
We have the first pixel value in the first row of the first color channel of the first image.
> t[0][0][0][0]
tensor(1)
Flattening the tensor batch
Alright. Let's see how to flatten the images in this batch. Remember the whole batch is a single tensor that will be passed to the CNN, so we don't want to flatten the whole thing. We only want to flatten the image tensors within the batch tensor.
Let's flatten the whole thing first just to see what it will look like. Plus I want to do a shout out to everyone who provided alternative implementations of the flatten() function we
created in the last post. Take a look.
> t.reshape(1,-1)[0] # Thank you Mick!
tensor([1, 1, 1, 1, 1, 1, 1, 1, 1, 1, 1, 1, 1, 1, 1, 1, 2, 2, 2, 2, 2, 2, 2, 2,
    2, 2, 2, 2, 2, 2, 2, 2, 3, 3, 3, 3, 3, 3, 3, 3, 3, 3, 3, 3, 3, 3, 3, 3])

> t.reshape(-1) # Thank you Aamir!
tensor([1, 1, 1, 1, 1, 1, 1, 1, 1, 1, 1, 1, 1, 1, 1, 1, 2, 2, 2, 2, 2, 2, 2, 2,
    2, 2, 2, 2, 2, 2, 2, 2, 3, 3, 3, 3, 3, 3, 3, 3, 3, 3, 3, 3, 3, 3, 3, 3])

> t.view(t.numel()) # Thank you Ulm!
tensor([1, 1, 1, 1, 1, 1, 1, 1, 1, 1, 1, 1, 1, 1, 1, 1, 2, 2, 2, 2, 2, 2, 2, 2,
    2, 2, 2, 2, 2, 2, 2, 2, 3, 3, 3, 3, 3, 3, 3, 3, 3, 3, 3, 3, 3, 3, 3, 3])

> t.flatten() # Thank you PyTorch!
tensor([1, 1, 1, 1, 1, 1, 1, 1, 1, 1, 1, 1, 1, 1, 1, 1, 2, 2, 2, 2, 2, 2, 2, 2,
    2, 2, 2, 2, 2, 2, 2, 2, 3, 3, 3, 3, 3, 3, 3, 3, 3, 3, 3, 3, 3, 3, 3, 3])
At the bottom, you'll notice another way that comes built-in as method for tensor objects called, you guessed it, flatten(). This method produces the very same output as the other alternatives.
What I want you to notice about this output is that we have flattened the entire batch, and this smashes all the images together into a single axis. Remember the ones represent the pixels from the first image, the twos the second image, and the threes from the third.
This flattened batch won't work well inside our CNN because we need individual predictions for each image within our batch tensor, and now we have a flattened mess.
The solution here, is to flatten each image while still maintaining the batch axis. This means we want to flatten only part of the tensor. We want to flatten the, color channel axis with the height and width axes.
These axes need to be flattened: (C,H,W)
This can be done with PyTorch's built-in flatten() method.
Flattening specific axes of a tensor
Let's run the following code:
> t.flatten(start_dim=1).shape
torch.Size([3, 16])

> t.flatten(start_dim=1)
tensor(
[
    [1, 1, 1, 1, 1, 1, 1, 1, 1, 1, 1, 1, 1, 1, 1, 1],
    [2, 2, 2, 2, 2, 2, 2, 2, 2, 2, 2, 2, 2, 2, 2, 2],
    [3, 3, 3, 3, 3, 3, 3, 3, 3, 3, 3, 3, 3, 3, 3, 3]
]
)
Notice in the call how we specified the start_dim parameter. This tells the flatten() method which axis it should start the flatten operation. The one here is an index, so it's
the second axis which is the color channel axis. We skip over the batch axis so to speak, leaving it intact.
Checking the shape, we can see that we have a rank-2 tensor with three single color channel images that have been flattened out into 16 pixels.
Flattening an RGB Image
If we flatten an RGB image, what happens to the color
What happens to the Color Channels?
Each color channel will be flattened first. Then, the flattened channels will be lined up side by side on a single axis of the tensor. Let's look at an example in code.
We'll build an example RGB image tensor with a height of two and a width of two.
r = torch.ones(1,2,2)
g = torch.ones(1,2,2) + 1
b = torch.ones(1,2,2) + 2

img = torch.cat(
    (r,g,b)
    ,dim=0
)
This gives us the desired tensor. We can verify this by checking the shape like so:
> img.shape
torch.Size([3, 2, 2])
We have three color channels with a height and width of two. We can also inspect this tensor's data like so:
> img
tensor([
    [
        [1., 1.]
        ,[1., 1.]
    ]
    ,[
        [2., 2.]
        , [2., 2.]
    ],
    [
        [3., 3.]
        ,[3., 3.]
    ]
])
Now, we can see how this will look by flattening the image tensor.
> img.flatten(start_dim=0)
tensor([1., 1., 1., 1., 2., 2., 2., 2., 3., 3., 3., 3.])
Note that the start_dim parameter here tells the flatten() method where to start flattening. In this case, we are flattening the whole image. However, we can also flatten only the
channels like so:
> img.flatten(start_dim=1)
tensor([
    [1., 1., 1., 1.],
    [2., 2., 2., 2.],
    [3., 3., 3., 3.]
])
Wrapping up
We should now have a good understanding of flatten operations for tensors. We know how to flatten a whole tensor, and we know how to flatten specific tensor dimensions/axes. We will see this put to use when we build our CNN. Until then, i'll see you in the next one!
quiz
 DEEPLIZARD
Message
DEEPLIZARD
Message
resources
updates
Committed by on